Scripted Weapon Tutorial - WORK IN PROGRESS TUTORIAL (STUB)
THIS TUTORIAL AND THE CODE PROVIDED IS PLACEHOLDER AND NOT THE FINAL VERSION
Regardless of that, this tutorial is still a valid tutorial and it will function
We will be writing tutorials, improving this one and improving the documentatios in the coming days
Creating a Scripted Gun in BrickPlanet
Step 1: Setting Up Your Gun Model
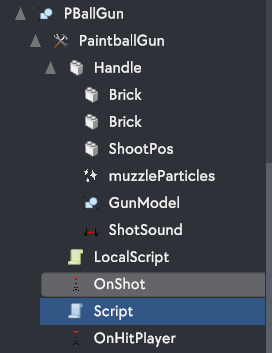
Step 2: Writing the LocalScript (Client-Side)
You'll need a LocalScript to handle client-side actions, such as shooting. Attach this script to your "PaintballGun" model.
-- basic tool stuff
local tool = script.Parent
local handle = tool.Handle
local player = Players.LocalPlayer
local mouse = player.Mouse

-- script related
local onShotRemote = tool.OnShot
local onHitPlayerRemote = tool.OnHitPlayer
local shootPos = handle.ShootPos

tool.ActivatedHeld:connect(function() -- when the player clicks
    print("activated")
    local ray = Ray.new(shootPos.position, mouse.origin.lookvector)
    local hit = Workspace:RaycastClosest(ray, player, 100)
    if hit then
        onShotRemote:FireServer(mouse.HitPosition.x, mouse.HitPosition.y, mouse.HitPosition.z)
        if hit:isA("Player") then
            onHitPlayerRemote:FireServer(hit.Username)
        end
    end
end)

tool.Equipped:connect(function() -- when it gets equipped
    equipped = true
    owner = tool.Parent
    print("equipped")
end)

tool.Unequipped:connect(function() -- when it gets unequipped aka they switch tool
    owner = nil
    equipped = false
    print("unequipped")
end)
Step 3: Writing the ServerScript (Server-Side)
You'll need a ServerScript to handle server-side actions like dealing damage to players and generating visual effects. Attach this script to the same hierarchy where the "PaintballGun" model is located.
-- Tool root refs
local Tool = script.Parent
local Handle = Tool.Handle
-- Remote events
local onShotRemote = Tool.OnShot
local onHitPlayerRemote = Tool.OnHitPlayer
-- Effects/Visuals
local bulletHolePart = ServerStorage.bulletHole
local muzzleParticles = Handle.muzzleParticles
local shotSound = Handle.ShotSound
local gunModel = Handle.GunModel
local gunOgRotation = nil
gunOgRotation = gunModel.LocalRotation
-- Gun params
local Damage = 20


function gunEffects()
    muzzleParticles:Play()
    gunModel.LocalRotation = gunModel.LocalRotation + Vector3.new(-20, 0, 0)
    wait(0.25)
    gunModel.LocalRotation = gunOgRotation
end

function bulletholeEffects(hitPos)
    local newHole = bulletHolePart:Clone()
    newHole.Position = hitPos
    math.randomseed(hitPos.x + os.time())
    newHole.Color = PartColor.new(math.random(75, 255), math.random(75, 255), math.random(75, 255), 255)
end

onShotRemote.OnServerEvent:connect(function(sender, hitposX, hitposY, hitposZ)
    print("OnShot Remote Fired")
    local hitPos = Vector3.new(hitposX, hitposY, hitposZ)
    bulletholeEffects(hitPos)
    gunEffects()
end)

onHitPlayerRemote.OnServerEvent:connect(function(sender, playername)
    local hitPlayer = Players.GetPlayerByUsername(playername)
    if hitPlayer == nil then return end
    hitPlayer:TakeDamage(Damage)
end)